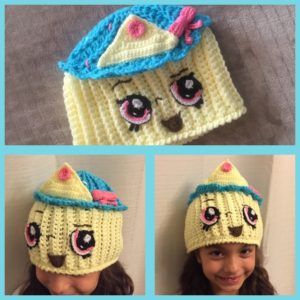
I received an order for a Queen Cupcake Shopkins hat but wanted something different than what I found online. I also didn’t want a slouch beanie or a bunch of stuffing piled on top of a 7 year old head. This is what I came up with. Cute but still comfortable! I hope you enjoy making this as much as I did!
Skill Level: Intermediate
Material: crochet or yarn needles (I used crochet dude needles which really helped with the small details), small detail scissors, measuring tape
Yarn: *substitute any worsted weight yarn
- ¼ skein Red Heart Super Saver Turqua*
- ¼ skein Red Heart Super Saver Perfect Pink*
- ¼ skein yellow yarn similar to Red Heart Super Saver*
I used what I had on hand for the yellow but I was the same weight and feel as red heart super saver. For the facial features, I used scrap yarn and here is what I know about those:
- Caron Super Soft Black*
- Impeccable White (has glitter in it)*
- Scrap cross stitch thread in a dark brown
Notes: I used invisible joins. You may use any method you are comfortable with.
Abbreviations:
sc – single crochet
dc – double crochet
fpdc – front post double crochet
MR – magic ring
sp – space
slst – slip stitch
crab stitch – reverse single crochet
picot – ch 3, sc in first ch (3rd from hook)
fsc – foundation single crochet
inv – invisible
*…* around – repeat instructions in between the *’s to the end of the round
clean turn – remove hook from loop, insert hook back into loop from the opposite side so that hook faces direction of work after turning; this is optional but makes it easier for sewing and adding trim to uneven edges
Abbreviations / stitches in between commas go in a single stitch.
Hooks: C, D, F, K
Frosting: Hook F, Blue Yarn, Gauge 4” = R1-R5 (approximately)
I took inspiration from the Divine Hat Pattern found on Ravelry but made adjustments for a frosted cupcake look:
R1: ch 2 (does not count as dc here or throughout), 15 dc in MR, inv join (15)
R2: ch 2, fpdc around every dc around, inv join around first fpdc (15)
R3: ch 2, fpdc around fpdc below ch 2, dc between fpdc’s, *fpdc around fpdc from previous row, dc in between fpdc’s* around, inv join (15 fpdc + 15 dc)
R4: ch 2, fpdc around fpdc below ch 2, dc in 1st sp between fpdc and dc, *fpdc around next fpdc, dc in 1st sp between fpdc and dc* around, inv join (15 fpdc, 15 dc)
R5-R6: ch 2, fpdc around fpdc below ch 2, 2 dc in first sp between fpdc and dc, *fpdc around next fpdc, 2 dc in 1st sp between fpdc and dc* around, inv join (15 fpdc, 30 dc) check gauge
R7-R8: ch 2, fpdc around fpdc below ch 2, 3 dc in first sp between fpdc and dc, *fpdc around next fpdc, 3 dc in 1st sp between fpdc and dc* around, inv join (15 fpdc, 45 dc)
R9-R10: ch 2, fpdc around fpdc below ch 2, 4 dc in first sp between fpdc and dc, *fpdc around next fpdc, 4 dc in 1st sp between fpdc and dc* around, inv join (15 fpdc, 60 dc)
R11-R12: ch 2, fpdc around fpdc below ch 2, 5 dc in first sp between fpdc and dc, *fpdc around next fpdc, 5 dc in 1st sp between fpdc and dc* around, inv join, fasten off with long tail, tighten tail left from MR and weave in. (15 fpdc, 75 dc)
Cupcake Wrapper: Hook K, Yellow Yarn, Gauge 4” = 4.5 rows (without stretch)
R0: ch 15, turn
R2: sc across chain, turn (14)
R3-R46: ch 1, sc in back loop, turn (14) check gauge after row 5
Fasten off with long tail. Sew ends together. Weave in both tails.
Using tail from frosting piece, weave down to row 11. Attach cupcake wrapper to frosting top by sewing 3 rows of wrapper to each shell except for every 5th shell where you will sew 4 rows to the shell. (15 shells x 3=45 rows + 1 row every 5th shell = another 3 rows for a total of 48 rows sewn evenly to 15 shells)
Cupcake Wrapper Bottom Edge: Hook K, Yellow Yarn
R1: Attach yellow yarn to bottom edge, ch 1, sc at the bottom of each row, join (48)
R2: ch 1, crab stitch around, fasten off
If you would like the full pattern, you can find it here. Thank you for supporting my family! – Hannah